• Skip to primary navigation
  • Skip to main content
  • Skip to primary sidebar
School Night Vegan
  • Recipes
    • Mains
    • Sides
    • Snacks
    • Desserts
    • Drinks
  • My Story
  • Contact
  • Subscribe
  • Pre-order cookbook
menu icon
go to homepage
  • Recipes
    • Mains
    • Sides
    • Snacks
    • Desserts
    • Drinks
  • My Story
  • Contact
  • Subscribe
  • Pre-order cookbook
subscribe
search icon
Homepage link
  • Recipes
    • Mains
    • Sides
    • Snacks
    • Desserts
    • Drinks
  • My Story
  • Contact
  • Subscribe
  • Pre-order cookbook
×

Home » Recipes » Recipes

Sourdough Focaccia

Jump to Recipe Print Recipe
freshly baked sourdough focaccia

Sourdough focaccia like you've never tasted before! Crispy on the outside with a salty crust and oh so soft inside.


This was the first sourdough focaccia I ever made! Yeah, I like to go from zero to hero pretty quickly! I had just acquired my first ever sourdough starter and I needed to put him (he's called Chewbacca) to good use! I had made loads of loaves of bread before but never anything as ambitious as this. 

I'm pleased to say that it worked beautifully and I've now made this recipe roughly 3 times a month since then! 

sourdough focaccia

What makes it so good??

I made sure this sourdough focaccia has just the right texture. I use some type '00' flour, which is usually reserved for pizzas and pasta. This makes it really super soft on the inside! I also like to give this sourdough focaccia a GOOD overnight prove. This really helps with flavour development, so it's not just a pretty face - it has FLAVA too!

sourdough focaccia

Sourdough notes!

Two notes before you start this one!

1. This recipe involves a 4 hour prove and an 8 hour prove. It’s worth it, but this is DEFINITELY a 2 day recipe, so maybe start making the dough around 4pm the day before you plan to eat it!

  • gluten development in dough
  • gluten development in dough

2. This recipe uses sourdough starter to make it rise, not shop-bough yeast. You’ll need to get a nice, well established starter going before you make this. There are loads of recipes on the interweb for a starter and you won’t look back once you get it going! I recommend this one!

Trust me, this is one of the best things i’ve ever baked, so it’s worth doing things properly with this one!

slice of sourdough focaccia

Final notes!

Last few things - promise!

  • Please promise me you'll go out and buy a really nice extra virgin olive oil for this recipe. So much of the flavour AND texture for this bake comes from the olive oil, so please make sure you're using good stuff, and not a bottle of vegetable oil from the back of the cupboard!
dough ready for topping
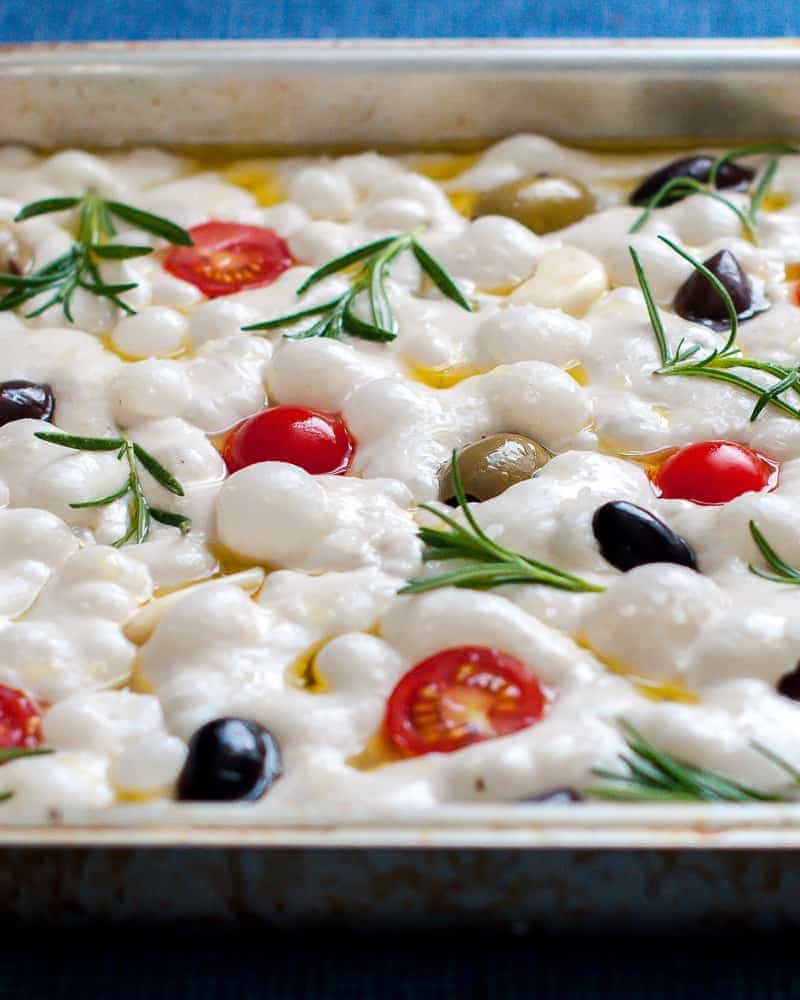
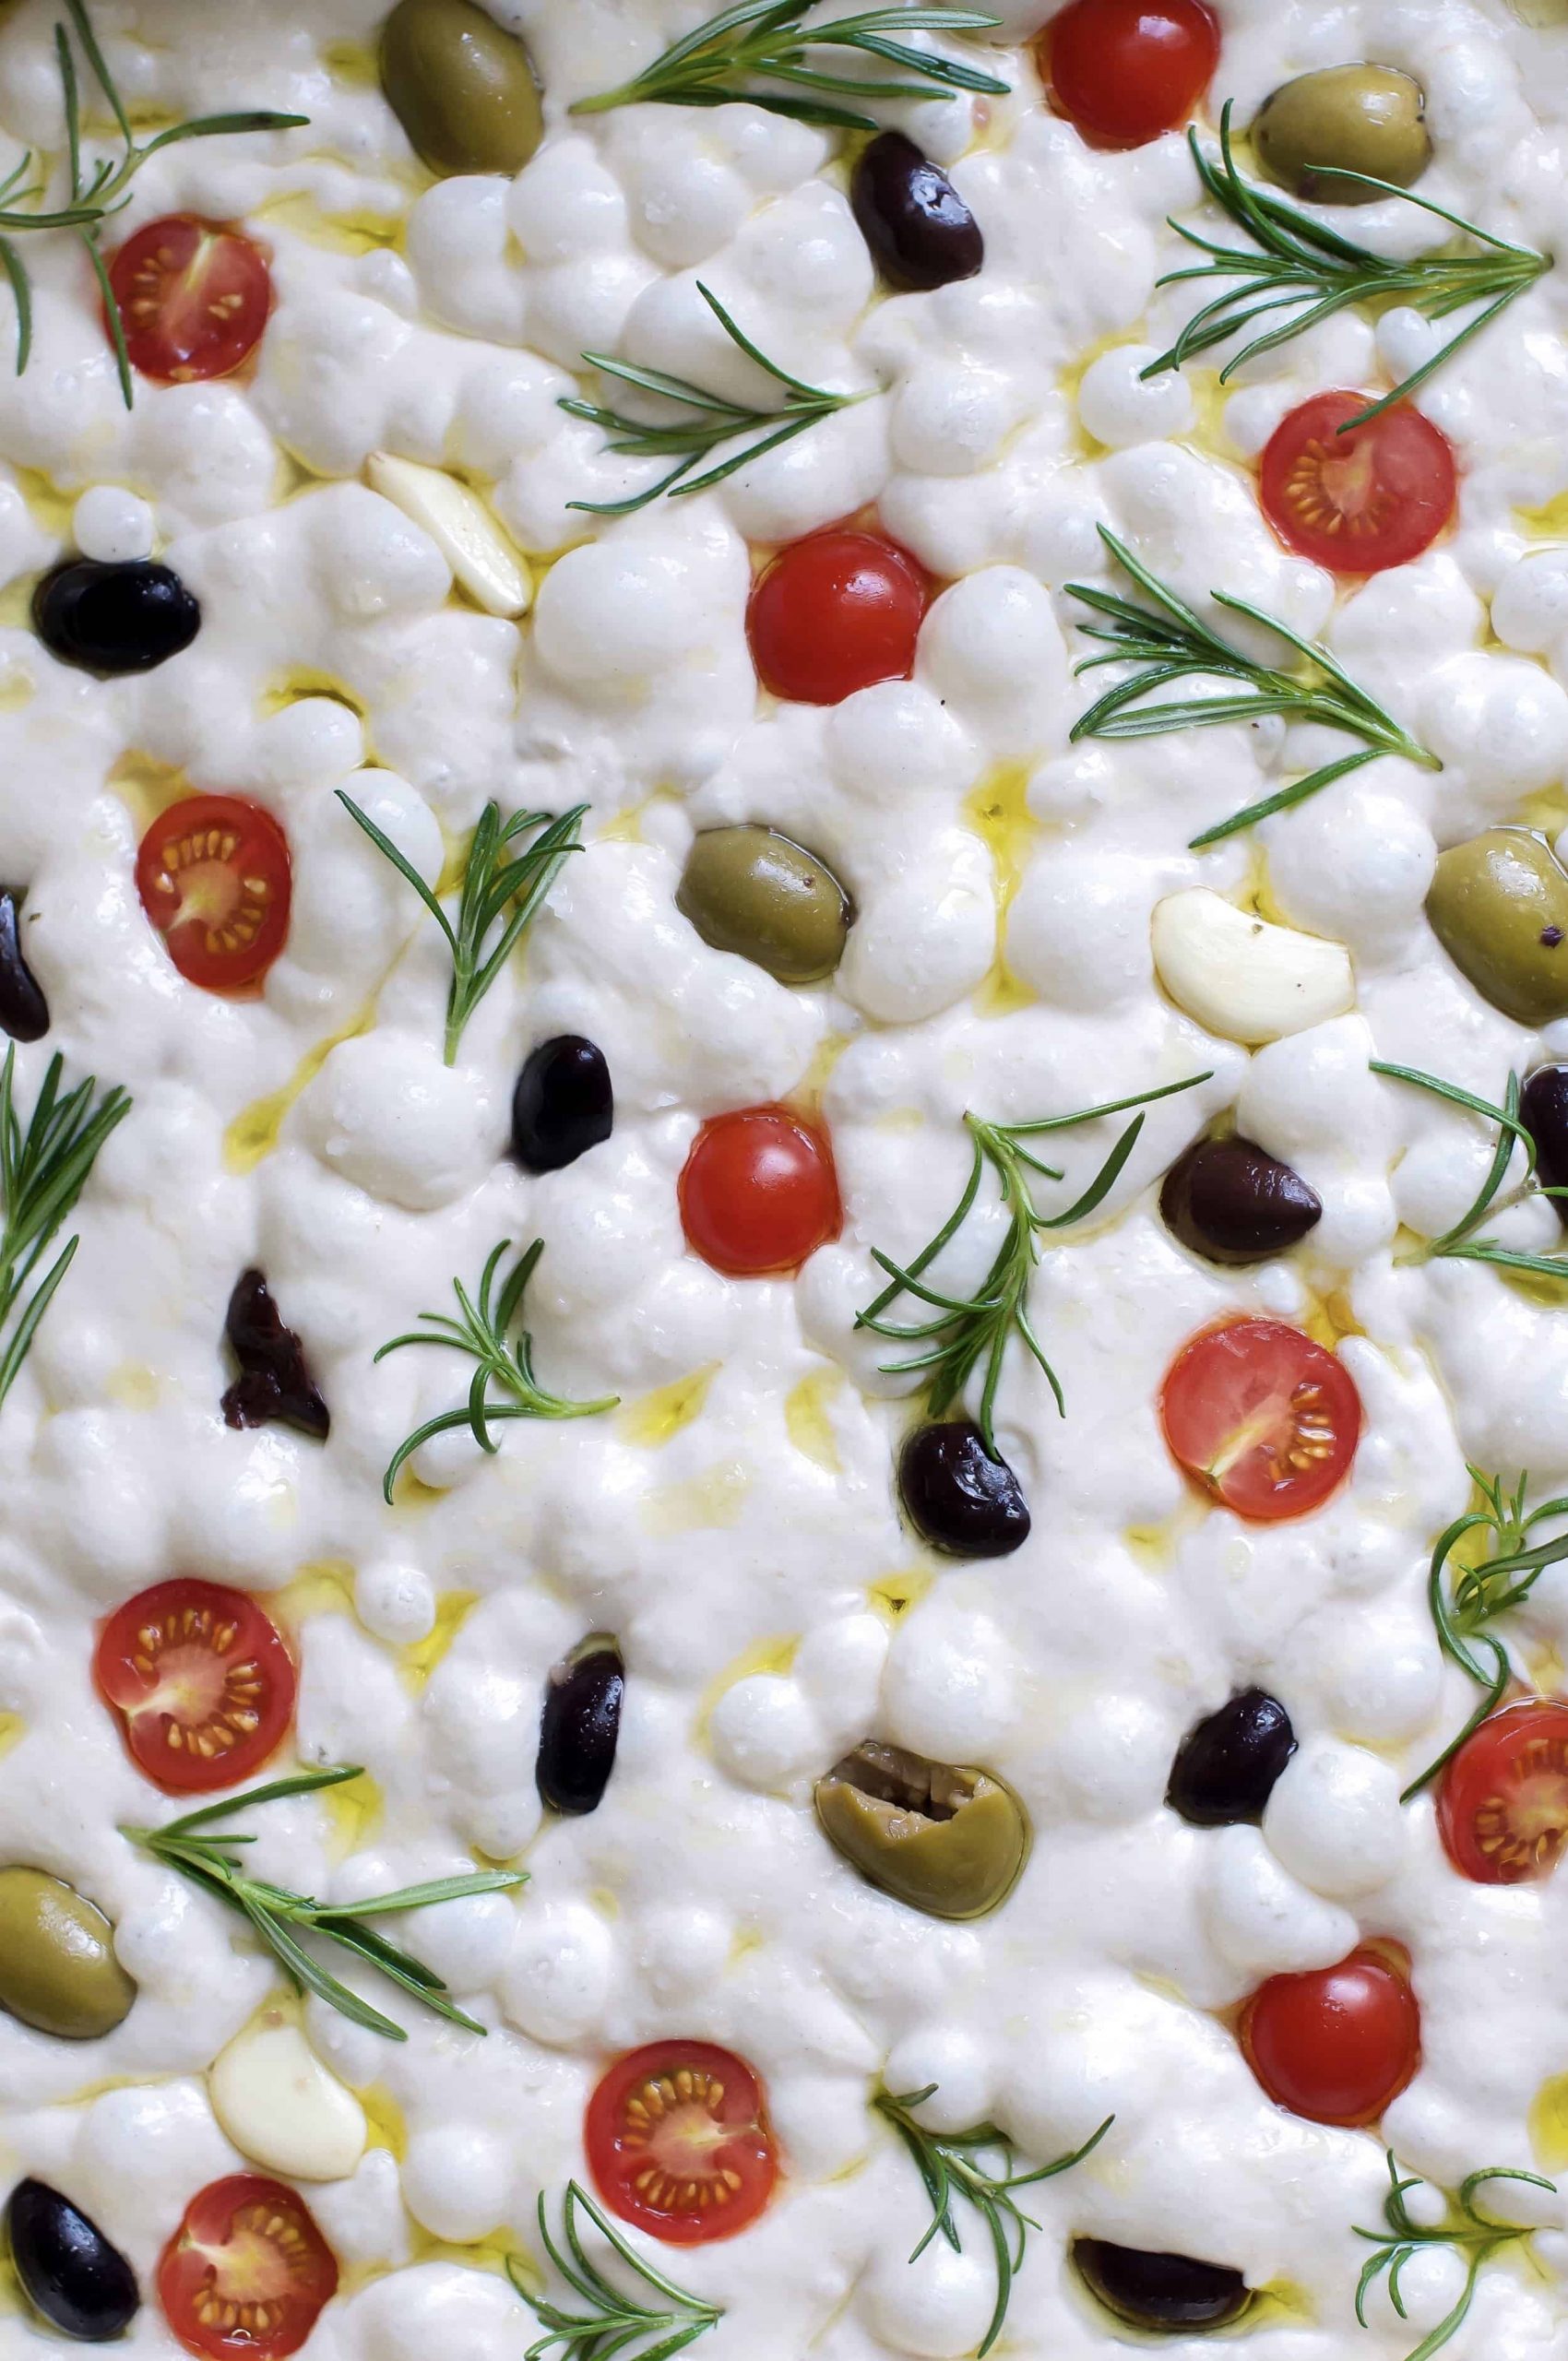
  • The toppings are also super important! Good olives maketh a focaccia... or something like that! I use olives, cherry tomatoes, garlic and rosemary, but feel free to go rogue with this. If you're using garlic, I'd recommend soaking it in a bowl of water with a pinch of salt over night before use. It helps it not to burn in the oven and takes away some of the sharpness!

Serve this sourdough focaccia alongside my vegan cannelloni for a super dreamy dinner!

proving focaccia
sourdough focaccia

Sourdough Focaccia

Richard Makin
The softest, crispiest sourdough focaccia ever!
5 from 36 votes
Print Recipe Pin Recipe
Course Side Dish
Cuisine Italian
Servings 12
Calories 239 kcal
Ingredients
  

For the Focaccia

  • 95 g sourdough starter (nice and active, around 2-4 hours after you last fed it)
  • 390 g water (at around 20c)
  • 345 g type ‘00’ white flour
  • 200 g strong white bread flour
  • 10 g fine sea salt
  • 14 g extra virgin olive oil

For the Topping

  • 4 tablespoon extra virgin olive oil
  • ¾ teaspoon flaky sea salt
  • Small handful of cherry tomatoes (halved)
  • 4 cloves of garlic
  • Small handful of kalamata and green olives (de-stoned)
  • 12-14 sprigs of rosemary
Instructions
 
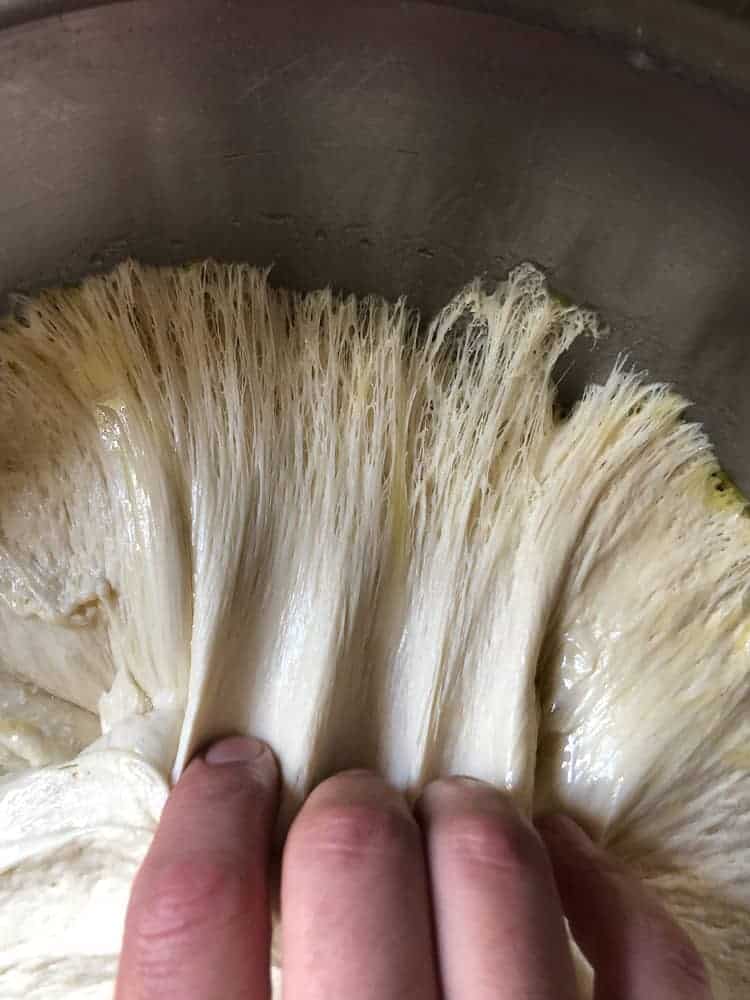
  • In the bowl of a stand mixer fitted with the dough hook, place the sourdough starter and the water. Using your fingers or a silicone spatula, mix the two together until the starter in quite evenly distributed. Add the flours and the salt. Lower the dough hook and mix on medium speed until the dough comes together and forms a shaggy, rather wet ball (around 5 minutes). Turn the speed to low, add the the olive oil and mix for a further five minutes. The dough will not look smooth and glossy yet, so don’t worry.
  • Grease a large Tupperware tub with a splash of olive oil and transfer the dough to the tub. Grab one side of the dough, pinch and stretch it up and over to the centre of the dough. Rotate the Tupperware 90 degrees and repeat: pinch and stretch the dough into the centre. Repeat two more times until you’ve made a total of four folds in the dough. Cover the tub with a damp tea towel and place in an ambient temperature of around 20-22c. Leave the dough to “bulk ferment” for a total of four hours, repeating the four folds another four times every half hour for the first two hours.
  • Meanwhile, grease a large, high sided brownie pan (around 23 x 33cwith a good drizzle of olive oil.
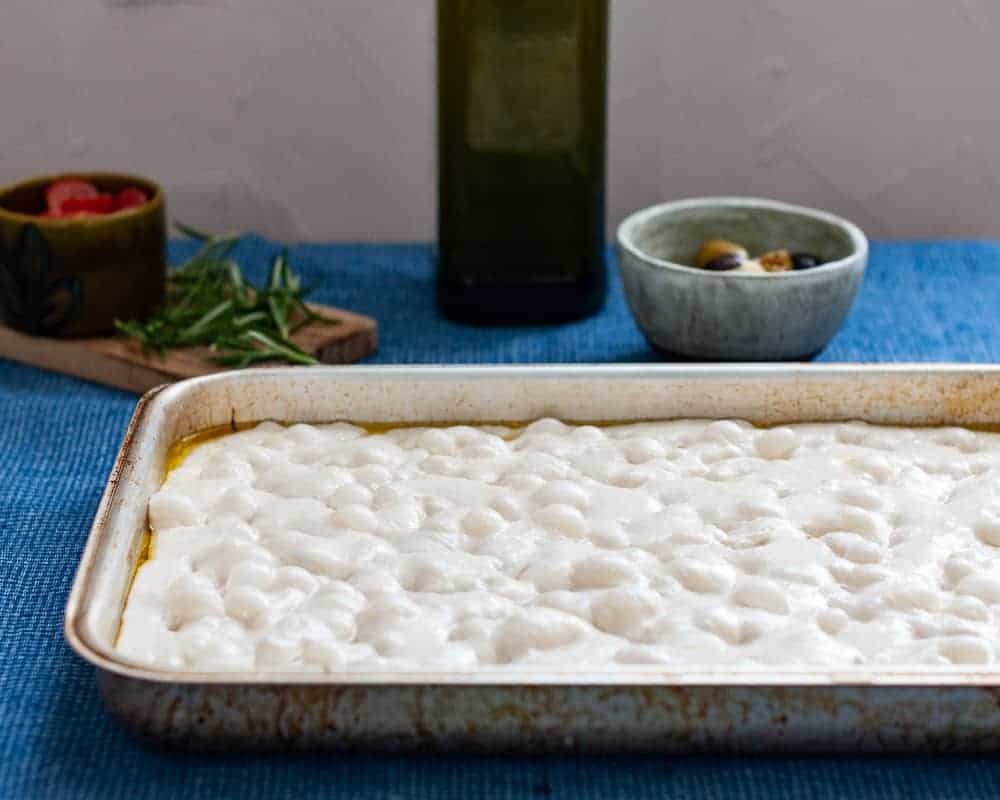
  • After the first two hours of fermenting and folding are done, transfer the dough to the oiled pan, cover and leave for the remaining two hours.
  • Once the dough is proved, place the entire pan of dough into a plastic bag or wrap with cling film and place in the fridge overnight or for a minimum of 8 hours.
  • The next day, or after 8 hours have passed, remove the dough from the fridge and place on the kitchen counter to come back to room temperature for an hour.
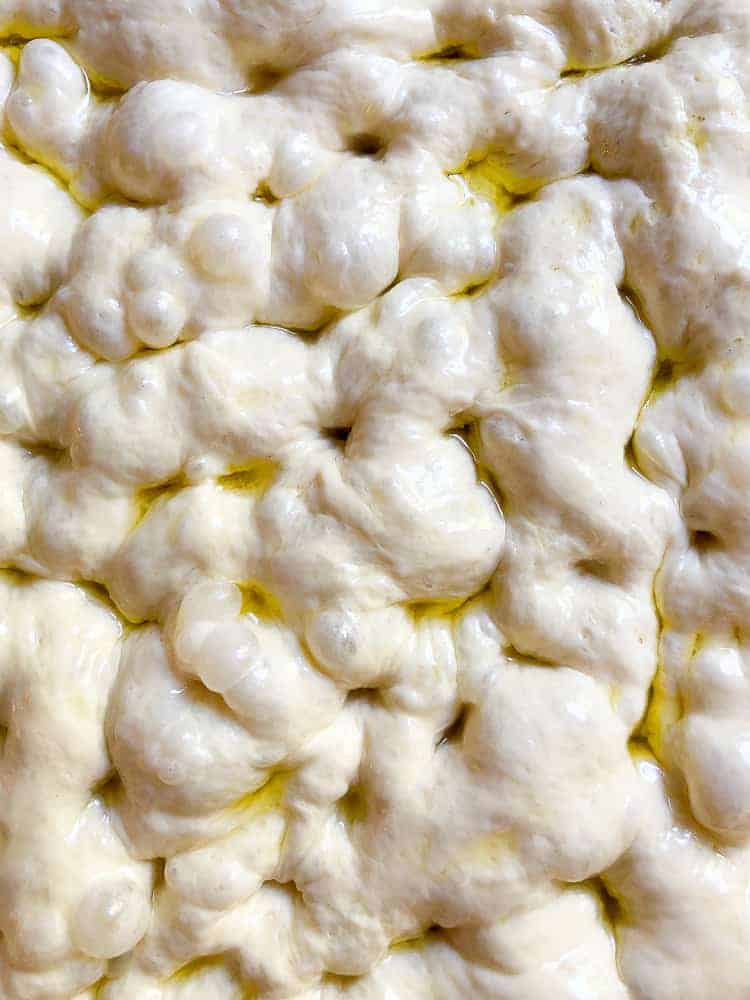
  • Once this hour is done, the second prove begins. This can take between 1 and 2 hours depending on the temperature of the room and the activity of your starter. Just keep an eye of the dough after the first hour of proving - it should become very bubbly and gassy.
  • About half an hour before your dough is ready, preheat the oven to 230c and prepare your toppings.
  • Once proved and nicely bubbly, wet your fingers and dimple the dough all over, making sure you push all the way down to the bottom of the pan.
  • Drizzle over the topping olive oil and sprinkle the flaky sea salt. Top with the herbs, olives, garlic and cherry tomatoes then place in the oven. Bake for 25 minutes, rotating after 15 mins.
  • Remove from the oven and leave to cool in its tin for 15 minutes. Carefully remove the bread from the tin once cool enough to handle and place on a wire cooking rack.
  • Focaccia tastes best warm within a few hours of baking, but you can also wrap in tin foil and store for a day or so. Enjoy!

Nutrition

Serving: 1gramsCalories: 239kcalCarbohydrates: 37gProtein: 5gFat: 8gSaturated Fat: 1gSodium: 602mgFiber: 2gSugar: 1g
Keyword sourdough focaccia
Love this recipe?Let me know on Instagram!

More Recipes

  • Vegan Egg Fried Rice
  • Vegan Spanish Omelette (Spanish Tortilla)
  • Vegan Banana Bread Pancakes
  • Vegan Carrot Cake

Reader Interactions

Comments

    Leave a Reply Cancel reply

    Your email address will not be published. Required fields are marked *

    Recipe Rating


  1. Rhi

    August 15, 2019 at 8:59 am

    Hi!
    For the 8 hour proof you said put in oven overnight but next step say take it out of the fridge. Does this need to be a cold proof in fridge or just a general covered in cold oven?
    Thanks, looking forward to my first sourdough focaccia ☺️

    Reply
    • Richard

      August 15, 2019 at 9:17 am

      Hey! My mistake - overnight proof should be in the fridge! Apologies!

      Reply
  2. cherry_kiss

    August 29, 2019 at 12:51 am

    hi I am an mother age 48 love to talk more.

    Reply
  3. julie

    February 10, 2020 at 5:42 pm

    5 stars
    Wow what a brilliant brilliant recipe! I watched a video on managing wet dough which was definitely helpful. I was sceptical that mine would be as bubbly but it was. So chuffed. Thankyou !

    Reply
    • Richard Makin

      February 11, 2020 at 9:54 am

      5 stars
      This is the best news! Thanks Julie!

      Reply
  4. julie

    February 10, 2020 at 5:42 pm

    5 stars
    Wow what a brilliant brilliant recipe! I watched a video on managing wet dough which was definitely helpful. I was sceptical that mine would be as bubbly but it was. So chuffed. Thankyou !

    Reply
  5. Richard Makin

    February 11, 2020 at 9:54 am

    5 stars
    This is the best news! Thanks Julie!

    Reply
  6. Ashwin Rao

    February 25, 2020 at 12:54 am

    5 stars
    Made this, and this was out of the world! Thanks for sharing this recipe!

    Reply
  7. Ashwin Rao

    February 25, 2020 at 12:54 am

    5 stars
    Made this, and this was out of the world! Thanks for sharing this recipe!

    Reply
  8. Linda

    March 02, 2020 at 11:52 pm

    5 stars
    Definitely the BEST focaccia I’ve ever made -5 star all the way. I see this as a regular go to. Thank you so much for such a fantastic recipe.

    Reply
  9. Linda

    March 02, 2020 at 11:52 pm

    5 stars
    Definitely the BEST focaccia I’ve ever made -5 star all the way. I see this as a regular go to. Thank you so much for such a fantastic recipe.

    Reply
  10. Meghan

    March 29, 2020 at 6:06 pm

    5 stars
    Myself and my parents just finished stuffing our faces with this focaccia. This is amazing bread. Thank you very much for the recipe!

    My mum informed me it tastes better than what they buy at the bakery <3

    Reply
  11. Meghan

    March 29, 2020 at 6:06 pm

    5 stars
    Myself and my parents just finished stuffing our faces with this focaccia. This is amazing bread. Thank you very much for the recipe!

    My mum informed me it tastes better than what they buy at the bakery <3

    Reply
  12. Vanessa

    April 01, 2020 at 12:19 pm

    Is it 230 degree fan or conventional? Very excited to get this in the oven!

    Reply
  13. Toni

    April 12, 2020 at 7:41 pm

    Hi Richard!! I don’t have a stand up mixer, can you provide instructions for timing on a hand kneed method, pretty please? Thank you!
    !

    Reply
  14. Louise Sutton

    April 18, 2020 at 3:35 pm

    Hi, what if I don’t have 00/pasta flour.? Can I use plain, or just use all read flour?

    Reply
  15. Alin

    May 10, 2020 at 8:50 am

    5 stars
    I tried this two times. I got a wet mass both times. My starter was active as i fed it hous before and it was growing. But the wet mass was imposible to stretch and fold. So first time i added more flouw making it easier to work with but got a freesbee focacia. Second time i got a quicksand dough. No use. So i think measurements are off in this recipe. So all in all two days wasted trying to reproduce this.

    Reply
    • Andrea

      May 14, 2020 at 9:54 pm

      I think it’s you, Alan. I tried this, never having made bread before and not being super precise with the measurements, and it came out great.

      Reply
    • Richard

      July 24, 2020 at 9:30 am

      Hey Alin, the dough will be wet after the the first mixing stage. The purpose of the stretch and fold is to build up strength in the bread. This is where the bread goes from sloppy “wet mess” to a stronger dough. The first stretch and fold will be tricky and not very stretchy but adding extra flour is definitely not the solution. Just leave the dough for the recommended 30 mins rest and try to stretch and fold again (as the instructions recommend). Good luck

      Reply
  16. Alin

    May 10, 2020 at 8:50 am

    5 stars
    I tried this two times. I got a wet mass both times. My starter was active as i fed it hous before and it was growing. But the wet mass was imposible to stretch and fold. So first time i added more flouw making it easier to work with but got a freesbee focacia. Second time i got a quicksand dough. No use. So i think measurements are off in this recipe. So all in all two days wasted trying to reproduce this.

    Reply
  17. Melissa

    May 10, 2020 at 11:25 pm

    I tried this recipe three times and it is stuck to the pan each time, no matter how much oil I put down first.

    Reply
  18. Kate Segall

    May 13, 2020 at 8:20 pm

    Mine completely stuck to the pan??? I put lots of olive oil in before the dough. Did I miss anything else?

    Reply
  19. LOIS GIBBS

    May 17, 2020 at 11:46 am

    5 stars
    thank you for this fantastic recipe - it was a great success

    Reply
  20. LOIS GIBBS

    May 17, 2020 at 11:46 am

    5 stars
    thank you for this fantastic recipe - it was a great success

    Reply
  21. Maria

    May 19, 2020 at 9:03 pm

    If I'm doing the recipe by half and baking in an 8x8 pan, how would this change the baking time? Thank you!

    Reply
  22. Martina

    May 26, 2020 at 11:52 am

    5 stars
    3rd time we are making this now, as it’s so good. There’s only 2 of us so we half the recipe, which works out pretty well. Just got it out of the fridge waiting for it’s final prove before yumminess will commence.

    Reply
  23. Martina

    May 26, 2020 at 11:52 am

    5 stars
    3rd time we are making this now, as it’s so good. There’s only 2 of us so we half the recipe, which works out pretty well. Just got it out of the fridge waiting for it’s final prove before yumminess will commence.

    Reply
  24. Deanna

    May 28, 2020 at 6:54 pm

    What temp do you cook it at?

    Reply
  25. Sandra

    June 03, 2020 at 8:35 pm

    Absolutely delicious!Used this recipe for the first time, easy to follow, did leave it in the fridge longer than time stated but it was fine. Will definitely do this again and experiment with different toppings.

    Reply
  26. Beth

    June 24, 2020 at 1:38 pm

    Can I use whole grain / whole meal flour?

    Reply
  27. James

    July 19, 2020 at 10:55 pm

    5 stars
    The bread came out so tasty and beautiful. Will definitely be making this again. But we were disappointed in how badly it stuck to the pan despite all the oil, we completely destroyed it trying to get a slice out. I wonder if we should move it onto parchment paper before baking?

    Reply
  28. James

    July 19, 2020 at 10:55 pm

    5 stars
    The bread came out so tasty and beautiful. Will definitely be making this again. But we were disappointed in how badly it stuck to the pan despite all the oil, we completely destroyed it trying to get a slice out. I wonder if we should move it onto parchment paper before baking?

    Reply
  29. Jessica Kerkar

    August 09, 2020 at 9:28 am

    5 stars
    So yum

    Reply
  30. Jessica Kerkar

    August 09, 2020 at 9:28 am

    5 stars
    So yum

    Reply
  31. Ellen Stephens

    February 21, 2021 at 11:40 am

    5 stars
    Hi, i baked this bread this morning and my family like it very much, thanks for sharing your recepie..

    Reply
  32. Ellen Stephens

    February 21, 2021 at 11:40 am

    5 stars
    Hi, i baked this bread this morning and my family like it very much, thanks for sharing your recepie..

    Reply
  33. Imogen

    March 25, 2021 at 1:57 pm

    5 stars
    Turned out amazing, 100% making this again !!!! All gone in less than an hour!!!!

    Reply
  34. Imogen

    March 25, 2021 at 1:57 pm

    5 stars
    Turned out amazing, 100% making this again !!!! All gone in less than an hour!!!!

    Reply
  35. Onur

    May 02, 2021 at 10:24 pm

    5 stars
    Dude that was magnificent! Before baking I poured a brine with water, olive oil and garlic than add the flaky which I highly recommend. I just adjust timing according to my room temp and activity of my yeast and boom! Thank you so much for sharing.

    Reply
  36. Onur

    May 02, 2021 at 10:24 pm

    5 stars
    Dude that was magnificent! Before baking I poured a brine with water, olive oil and garlic than add the flaky which I highly recommend. I just adjust timing according to my room temp and activity of my yeast and boom! Thank you so much for sharing.

    Reply
  37. Gabriele

    October 10, 2021 at 1:16 pm

    5 stars
    I make this recipe almost weekly. Even for a beginner sourdough baker, like myself, this recipe has been a success. Love it, love it, love it.

    Reply
  38. Gabriele

    October 10, 2021 at 1:16 pm

    5 stars
    I make this recipe almost weekly. Even for a beginner sourdough baker, like myself, this recipe has been a success. Love it, love it, love it.

    Reply

Primary Sidebar

Richard Makin is the School Night Vegan.

Richard has been exploring the world of plant-based cuisine since November 2017 when he switched from life-long vegetarian to full-time vegan!

More about me →

Popular

  • Vegan Meatballs
  • Vegan Sloppy Joes
  • Vegan Chicken Noodle Soup
  • Vegan Ham (Roasted Celeriac)
  • Vegan Shrimp (Vegan Prawns)
  • Vegan Blinis

Footer

  • Privacy Policy
  • About

↑ Back to Top

  • Contact
  • Media Kit